Lapbooks that become a small folding book with flaps, are a very useful and attractive way to work on projects and also collect the activities that children do keeping the information organized in a very practical way. We are going to learn to make lapbooks together From the beginning.
But at first it may seem complicated if we have never made one. We can buy them with templates and activity proposals or we can design them with our children, to make them more personalized. And helping, we can make them with our young children from the age of three, adapting them to their age, with photos and drawings but with hardly any text.
The video of the presentation, we can see a beautiful, very complete lapbook that has been offered on YouTube by Meninheira, the author of the blog Dálle un colinho, and that offers us, without words, many ideas so that we can learn together to make a lapbook.
This other one, although in English, shows us a very complete lapbook about flowers, designed for young children. In it there are a variety of possible elements to include inside and also proposals for related topics, details and cross-cutting activities that take the flowers as a thread.
Let's now start at the beginning to learn to make a lapbook together, and first, are the necessary materials.
Preparing our first lapbook: the materials
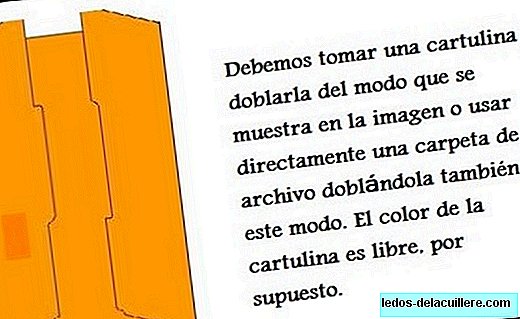
We are going to need a cardboard or an archive folder made of thin cardboard, of which they already come with an inside fold. We will fold it as shown in the video, folding the outer wings inwards, leaving it four times less wide than at the beginning and then unfolding the central fold or directly folding it in three, with the central part twice as wide as the lateral ones. This will be our base for the lapbook.
The materials that we are going to need are:
Preparing our first lapbook: the base

The idea is that in the small folding book we can include all the significant information for the child that we can and that interests him, in an attractive and fun way, without a specific order, but letting the imagination guide us and doing, in addition, a visually attractive work and in which the index does not exist, but that everything appears before our eyes quickly.

Inside the folder we will put cardboard pockets, folded papers inside them, additional folding and eye-catching colors, little booklets made by children, envelopes. little ones ... any element that allows us to save and keep the information stored and organized.
The letters and drawings we put should be bright colors and different formats, to be more striking and make us find what we are looking for easily.
Of course, if in the additional papers we include schematics, mind maps, maps ... adapted to the child's age, but always trying to offer the information visually and clearly.
For younger children we will use few elements, maybe just drawings inside the folder. I love the simplicity of this example taught in Amigos Homeschoolers
Preparing the theme of our first lapbook
We continue now learning to make a lapbook. Before starting, logically, we must have chosen the topic that we are going to discuss in our lapbook. Ideally, the child is the one who decides, at least at the beginning, the subject, looking for something that fascinates him, that he already knows enough or that he wants to expand his research.
We can also buy a guide such as those offered by Educarpetas or the Meninheira Educational Page, to whom we owe two of the beautiful videos that we publish, which is also something that attracts the child and print every day some of the activities they propose to us . To start making lapbooks, those that come with templates and activity suggestions are a great option, which encourages children's creativity and helps us learn to also develop our ability to propose things for them.
Do not think about doing it all at once, a lapbook is a project to do with care and we will spend at least a week. If before starting we have made an outline with the things we can include, we can make a small calendar, which, incidentally, serves the child to plan their tasks in the future and know how to organize their activities.
To plan the content we can make a typical vertical scheme or a mind map, structuring the contents by helping us with questions such as what is it ?, when does it happen or happened ?, how is it ?, where do we find it ?, which parts is it done ?, what things does it relate to? or what is it used for?
Before we start we can be inspired by looking for resources in the library, internet, a museum or a related natural place. We can also watch a movie or a documentary, even some cartoons if the child is smaller. Talk about the subject and look at the books we have at home, crop photos or print them ... all that will help us get inspired and organize with all the things that, surely, we can think of to include.
I have offered you a first lesson for learn to make a lapbook. I will show you more examples and themes to develop, with proposals for your little ones this summer. Enjoy it.
Vidéos | Dálle un colinho channel on YouTube